Focus on Level Design with Automapping
Wouldn’t it be nice if the right tiles fell into place automatically? With Tiled’s Automapping, they can!
In this tutorial, we’ll set up rules that turn a simple blueprint into a polished dungeon. We’ll be using the following cute Dungeon tileset, one of the many free tilesets released on CraftPix.net:
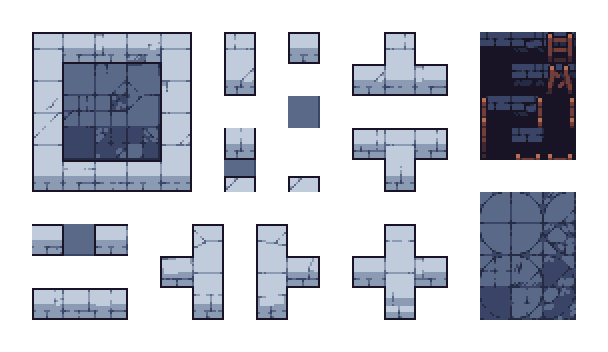
This nice little tileset offers many variations of wall and floor and ships with a large collection of static and animated decorations to embellish the levels we can create.
When drawing a dungeon with this tileset in Tiled however, one quickly realizes how tedious it is to make sure each corner of the dungeon is using the intended piece of wall. It could put an early halt to the career of many aspiring level designers! Fortunately, Tiled offers ways to automate much of this process.
Using the Terrain Brush
The easiest to set up are what Tiled calls “terrains”. Although more commonly used for automatic placement of terrain transitions, it can easily handle the wall as an Edge terrain.
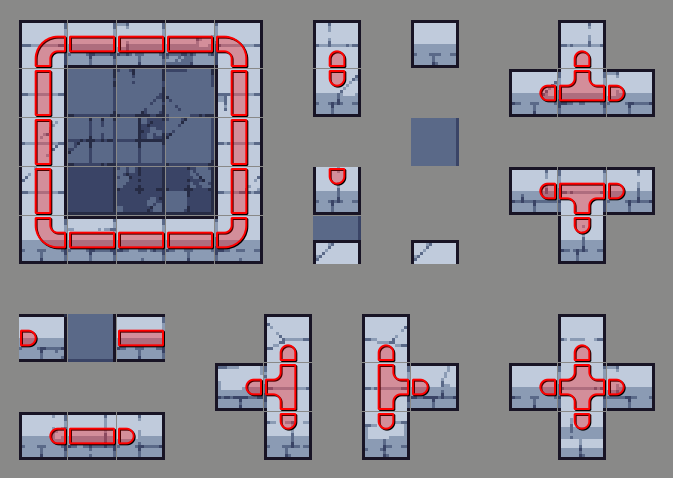
By defining the “Wall” terrain, Tiled knows how the tiles connect to each other and can choose the right tile for each location when we use the Terrain Brush to draw our walls.
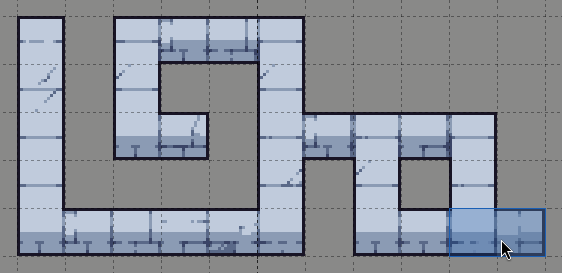
While this is a big improvement over manual tile placement, we still need to erase and adjust those walls if we need to make changes to our dungeon’s floor layout. In addition, the Terrain Brush is not suitable for placing the other tiles. Fortunately we can go a step further, with Automapping!
Introducing Automapping
Automapping is a somewhat hidden but powerful feature. It is set up almost entirely using regular maps which define tile placement rules. We call a map that defines such rules a “rule map”.
From Blueprint to Polished Dungeon
There are many ways to use Automapping in a project. It can be used to create variation, highlight errors, replace tiles or automate tedious work. In this tutorial, our goal will be to enable a workflow where we can edit a “Blueprint” layer that is automatically transformed into a level with floors and walls.
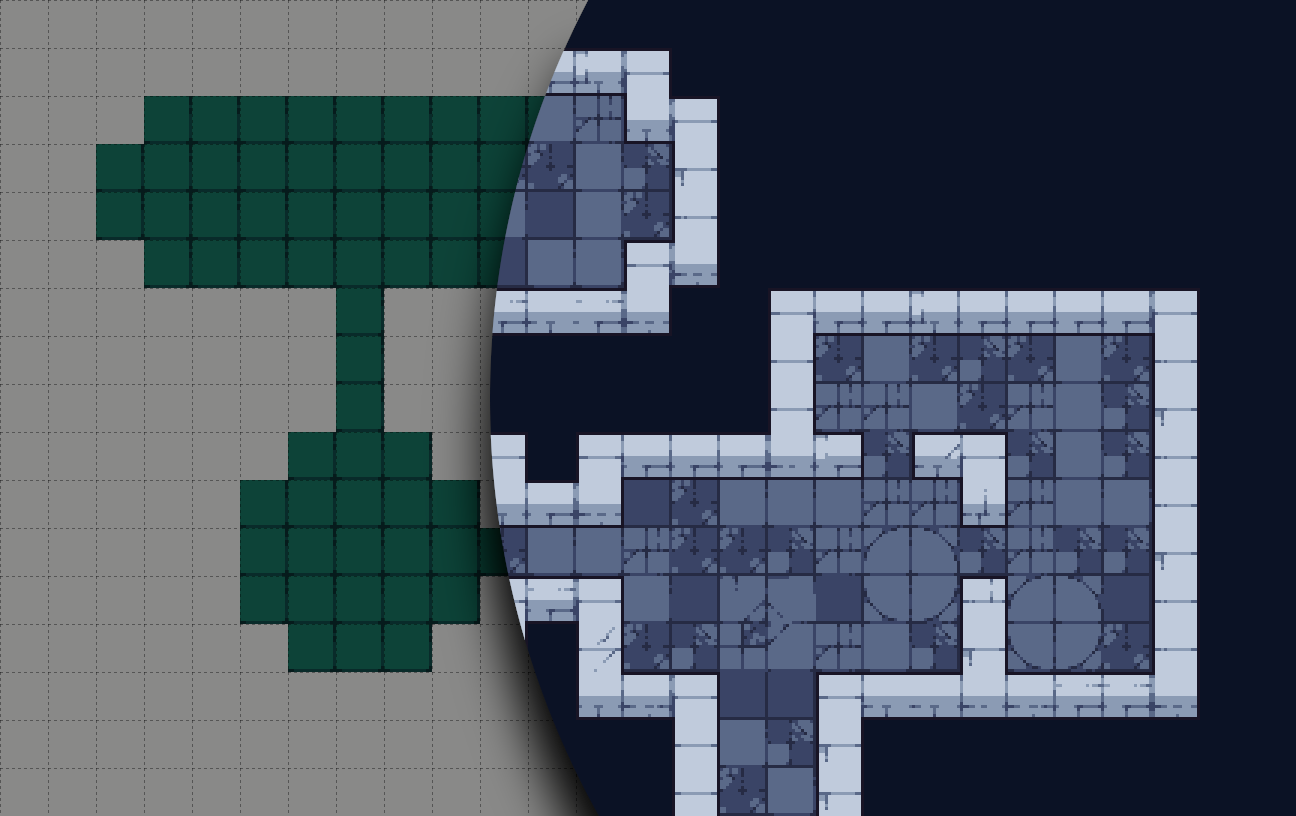
The above map has two layers: a “Blueprint” layer which we will edit, and an “Automap” layer which will be populated based on rules. The “Blueprint” layer only uses the basic “floor” tile to mark the rooms. To set it apart from the “Automap” layer it is tinted green using the layer Tint Color property.
This approach allows us to focus on the level design while the Automapping rules take care of the boring part! If we want, we can even see our polished dungeon update immediately while editing the blueprint.
Basic Setup
Create the Tileset
The tileset is using 16 x 16px tiles without any space in between. Make sure not to embed the tileset in any map, but to save it to its own file, say dungeon.tsx.
Create the Rule Map
Each Automapping rule has an input, which defines when the rule applies, and an output, which defines what to apply wherever the rule applies. In a rule map, the inputs and outputs are defined on layers with special names:
input_<layer-name>- An input tile layer that defines the expected content for the layer called “<layer-name>” for each rule on the rule map.
output_<layer-name>- An output layer that defines the content to apply to the layer called “<layer-name>” wherever each respective rule matches.
Now, create a new infinite map and save it as rules.tmx. This will be our rule map. Make sure the map has only the following tile layers:
output_Automap(defines rule outputs for the “Automap” layer)input_Blueprint(defines rule inputs for the “Blueprint” layer)
The target layer names are case-sensitive!
Note
Making the map “infinite” avoids any need to resize this map later and allows us to expand the rules in any direction, but you can of course also use a fixed size rule map.
Draw the First Rule
Let’s define a simple rule to place the polished floor. It will say “When there is a floor tile on the Blueprint layer, place a floor tile on the Automap layer”. For the sake of visibility we’ll place a slightly different floor on the “Automap” layer (we’ll add some variation to this rule later). This simple rule is encoded on our map as follows:
| Layer | Tile |
|---|---|
output_Automap |
 |
input_Blueprint |
 |
Make sure to place the above tiles in the same location on each respective layer. This way, we define a rule that outputs floor tiles to the Automap layer in exactly those locations where it sees a floor tile in the Blueprint layer.
Save the rules.tmx map.
Create the Dungeon Map
Now create a map for the first dungeon level, let’s say a fixed 25x15 tile map, and save it in the same folder as the rule map. Make sure it has the following tile layers:
AutomapBlueprint
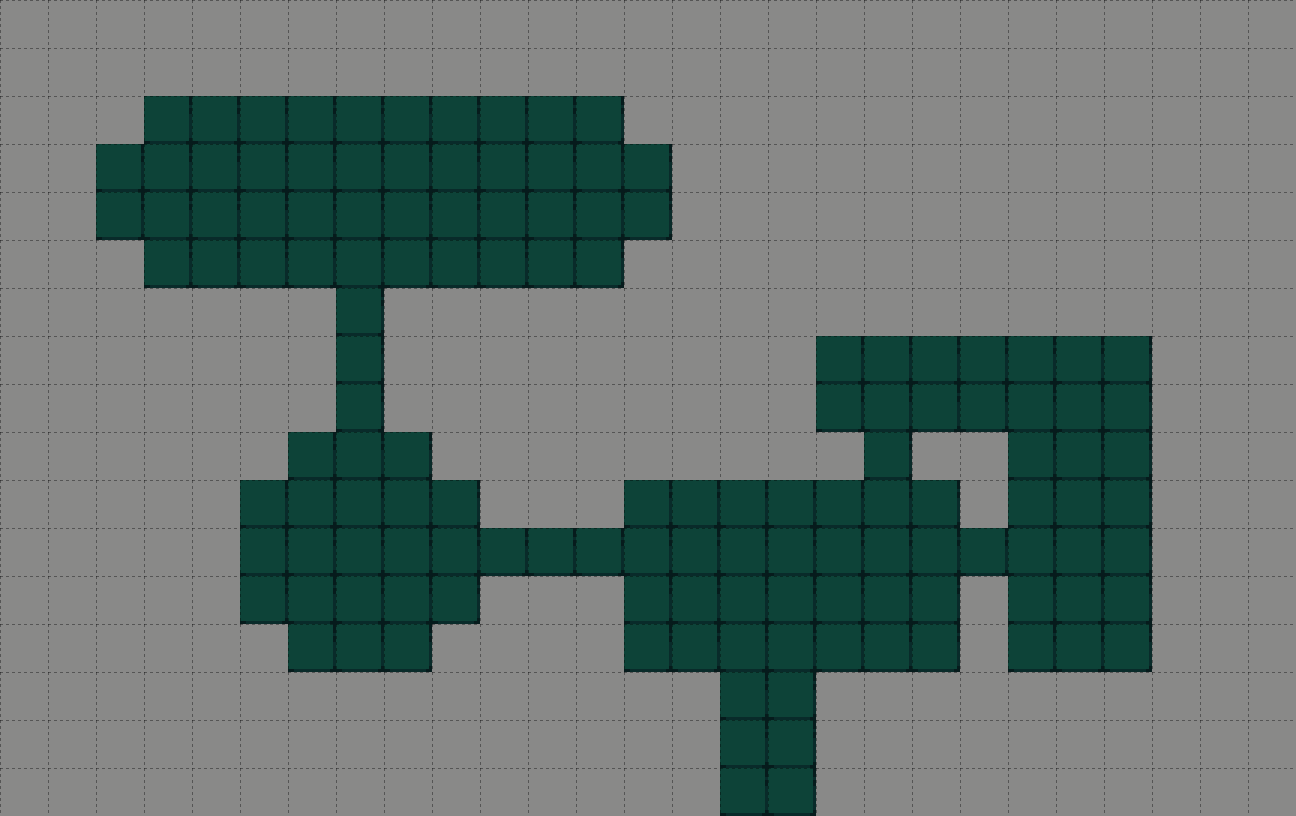
Select the floor tile we used in the input layer of our rule map and paint a quick room on the “Blueprint” layer.
Enabling Automapping
Before we can apply our Automapping rule, we need to tell Tiled which rules apply to our map. There are two ways in which we can do this:
-
Create a
rules.txtfile in the same folder as our dungeon map, with the following content:rules.tmxThe
rules.txtfile lists all rule maps that should be applied to the maps in the same folder. -
Alternatively, create a Tiled Project (if you haven’t yet) and go to Project > Project Properties and set the “Automapping rules” to our
rules.tmxfile. This way, these rules will apply whenever editing maps while this project is open.It is also possible to refer to any
*.txtfile containing references to rule maps from the Automapping rules property.
With that set up, trigger the AutoMap action and you should see the “Automap” layer getting populated!
Erasing Tiles
You might have noticed that when erasing tiles from the “Blueprint” layer, the AutoMap action does not erase any floor tiles from the “Automap” layer. Indeed, we have only one rule and it only places tiles. Let’s set up another rule that clears the “Automap” layer first. For this, we’re going to use some special tiles.
- Open the
rules.tmxmap. - Use Map > Add Automapping Rules Tileset to add the special tiles.
- Draw the following rule either to the left or above the rule that places the floor tiles:
| Layer | Tile |
|---|---|
output_Automap |
 |
input_Blueprint |
 |
As we wrote before, each rule needs an input and an output. But for this rule, we don’t care what is on the “Blueprint” layer. We just want to clear any previously placed tiles from the “Automap” layer before we let our other rules put the right ones back. For this we used the special “Ignore” tile.
The special “Empty” tile means “erase here” when used as a rule’s output.
Save the modified rules.tmx before switching back to our dungeon map (this is necessary to trigger the reloading of the rules). Now, confirm that the “Automap” layer is updating both when placing floors in the “Blueprint” layer, as well as when erasing them!
Placing Walls
Adding and removing bits of floor was easy, but what about the walls? Our rules will get a bit more complicated, because we need to place straight pieces, corners or even T-junctions depending on the surrounding tiles.
Edges
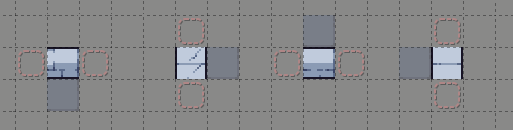
Let’s return to our rule map. We’ll start by placing the straight pieces. There are 4 patterns that describe the situations in which we need a straight piece of wall: below, left, above and to the right of a floor tile.
In our rule map, we can draw these patterns as follows, using the floor tile we’re using on our “Blueprint” layer and the special “Empty” tile to match the sides of each room or corridor.
| Layer | Tiles |
|---|---|
output_Automap |
 |
input_Blueprint |
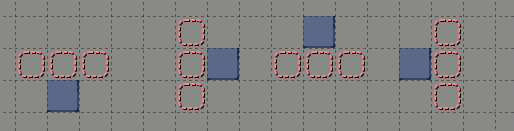 |
The input layer is visible in the output layer image to make it clear where the output tile is placed relative to the input pattern. Note that we’ve used the following edge tiles from the tileset in the outputs of the rules:
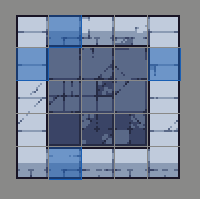
There are some variations, and actually the left/right and top/bottom edge tiles can be exchanged as well, but we’ll deal with variations later.
Because these rules require the special “Empty” tile on the sides they won’t place the edge tiles where we would actually like to place a corner or other tile. However, this isn’t strictly necessary because we’ll use the order in which the rules are applied to paint more specific tiles later.
It’s a good idea to save the rule map often and check whether the changes we’re making are working as expected. Let’s do that now!
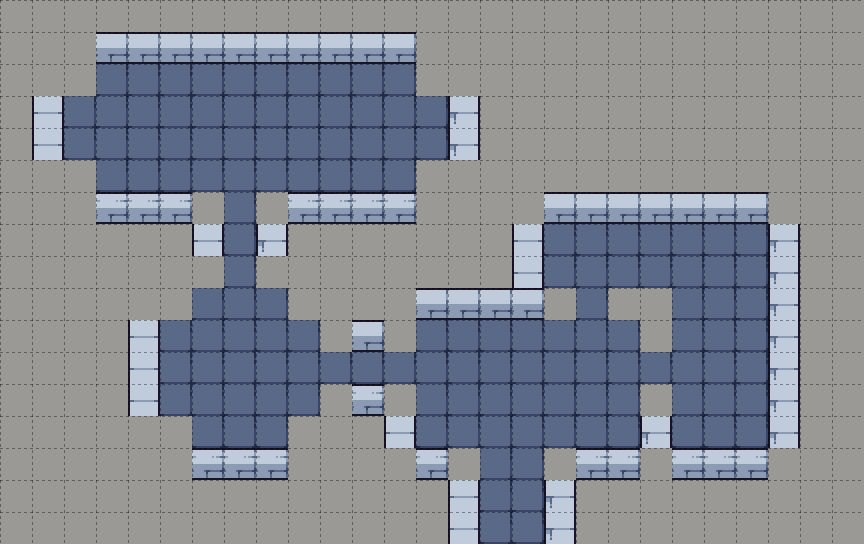
Corners
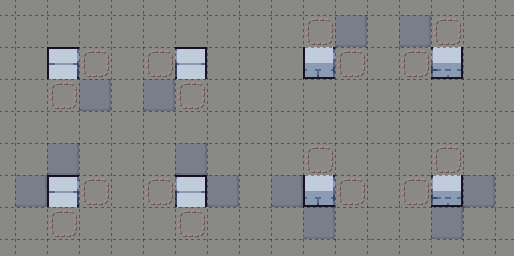
Placing the corner tiles is similar, though it requires a few more rules since there are inner corners and outer corners, for a total of 8 rules:
| Layer | Tiles |
|---|---|
output_Automap |
 |
input_Blueprint |
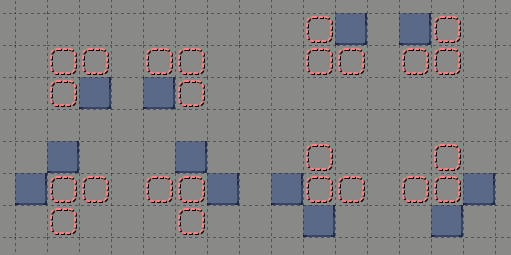 |
Note that we’ve left empty the locations which are not immediately relevant. The outer corner rules actually cover situations where we will need a T-junction or cross tile. But since the matching rules are always applied in the order in which the rules are defined, we can override the output with more specific rules later.
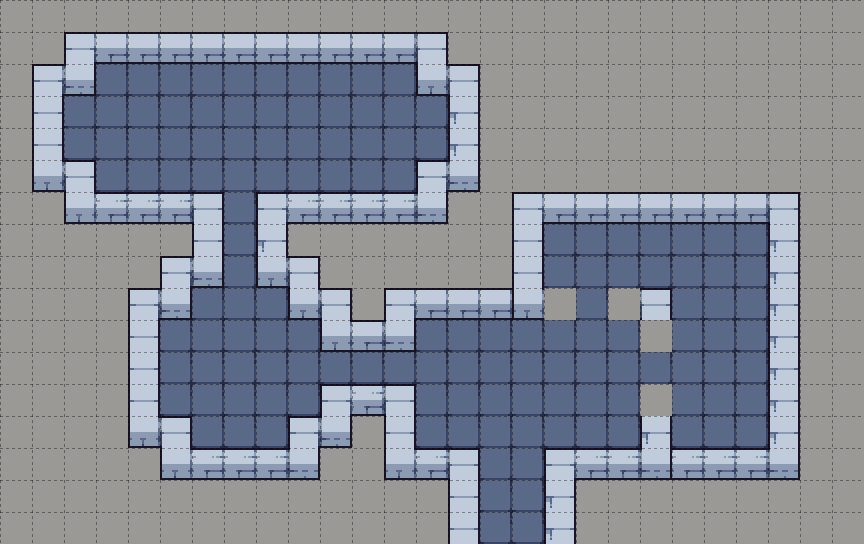
These rules already cover the majority of this map, but quite noticeably fail to place the wall ends. Less obvious are the misplaced corner and edge tiles (can you find them?), which should really be T-junctions.
Wall Ends
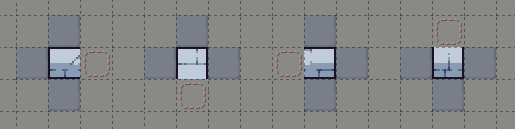
The situations in which we need wall ends are quite easy to define, so let’s cover those first:
| Layer | Tiles |
|---|---|
output_Automap |
 |
input_Blueprint |
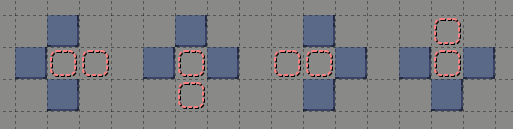 |
These rules describe exactly the situations for each wall end tile, nothing more and nothing less. To save a little space I won’t share the result again here, but if you’re following along please do remember to save and verify your rules.
T-Junctions
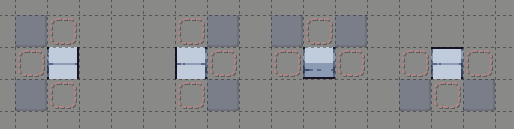
T-junctions are more tricky. We need them wherever two corners come together side by side, but also when a corner meets an edge. To keep things organized, we’ll do as we did with the corner tiles above and define the rules with the same output together in columns.
First, let’s look at all the ways two corners can cause the need for a T-junction:
| Layer | Tiles |
|---|---|
output_Automap |
 |
input_Blueprint |
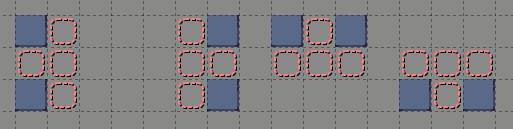 |
When any two of the above rules match we’ll actually need a cross tile, but we don’t need to care about that here because we’ll place the cross tiles in a later rule.
Now let’s look at the situations where a corner meets an edge. Since the corner can be on two sides, we’ll need another two rules for each T-junction tile:
| Layer | Tiles |
|---|---|
output_Automap |
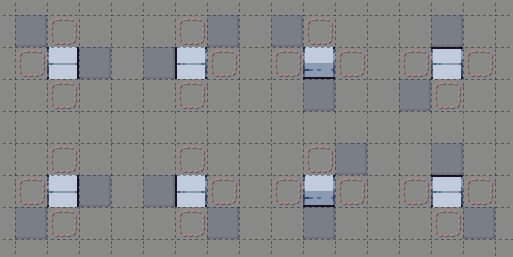 |
input_Blueprint |
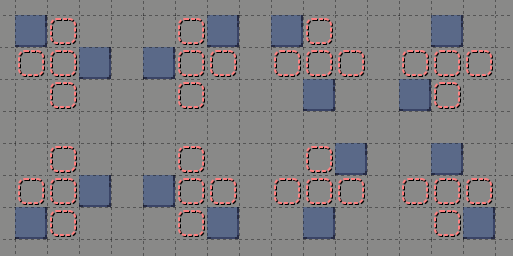 |
Remember to save and verify your new rules when you’re following along!
Cross
Now we’ll place the cross. Intuitively we’ll need this where 4 corners meet, but in fact it is enough for two corners to meet each other diagonally. This can happen in two ways:
| Layer | Tiles |
|---|---|
output_Automap |
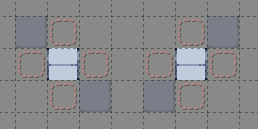 |
input_Blueprint |
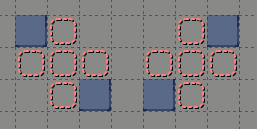 |
If 4 corners meet, both of these rules will match and the output of the rule on the right will override the one on the left.
Lone Wall
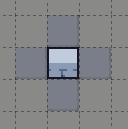
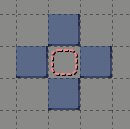
Finally, there’s the lone wall tile, which is only used when it is surrounded by floor tiles on all sides.
| Layer | Tiles |
|---|---|
output_Automap |
 |
input_Blueprint |
 |
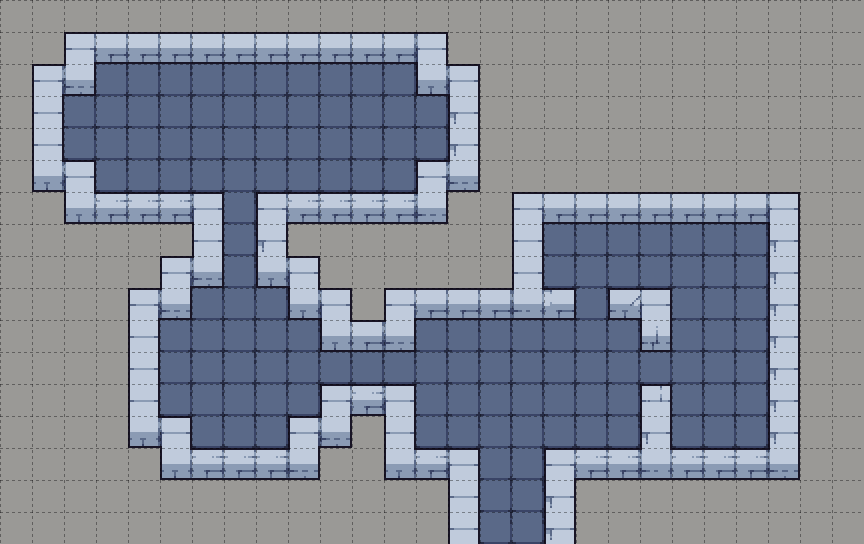
I’ve included an image of the expected result with all rules in place. Unfortunately our example doesn’t trigger all situations. I encourage you to create a test map that triggers all rules!
AutoMap While Drawing
Now that we’ve got all the rules down, it’s time to try another cool Automapping feature: Automapping while drawing. Try enabling the Map > AutoMap While Drawing option and see how the “Automap” layer is immediately updated whenever we edit the “Blueprint” layer!
Unfortunately, you’ll also notice that it does not always work correctly, especially while erasing tiles. It often fails to delete the existing wall tiles and it doesn’t always place the expected walls either. A manual triggering of the AutoMap action will fix up the map, but there’s a nicer way.
To maintain a snappy performance when using “AutoMap While Drawing”, each rule is only applied wherever the bounding rectangle of its input has some overlap with the modified area. The erasing rule is 1x1 and as such will only erase exactly the modified area. Most other rules however are 3x3 and as such the area where they are applied is bigger.
To expand the region where the erasing rule is applied as needed, we just need to increase the erasing rule’s input region to 3x3 as well. We can do this using the special “Ignore” tiles. At the same time, since we now erase a larger area, we need to make sure to expand some of the other rules to 3x3 as well.
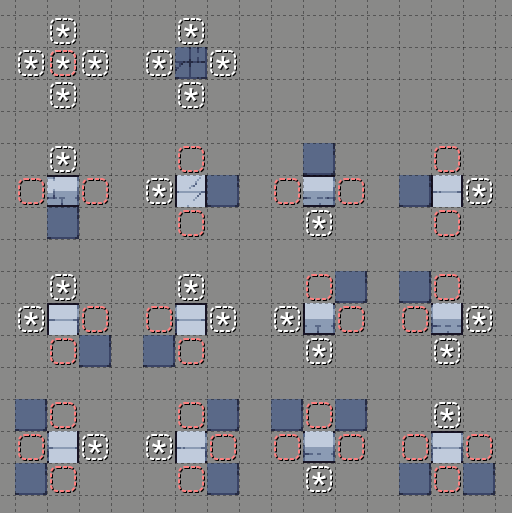
For brevity I’ve left out the rules that were already 3x3. Note that we don’t need to draw a full 3x3 grid. Placing “Ignore” tiles on the sides is enough to expand our input’s bounding rectangle as needed.
If you’re following along, save the expanded rules and verify that Automapping now works great while drawing as well!
Adding Variation
Many of our tiles have multiple versions, which we can use to add some variation to our map. For this, we’ll add multiple outputs to our rules.
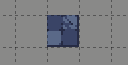
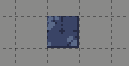
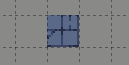
To start, rename the “output_Automap” layer to “output1_Automap”. The “1” is called the “output index”, but it does not need to be a number. When a rule matches which uses multiple output indexes, Tiled will randomly choose one of the indexes and place only those outputs using the chosen index.
Note
The handling of output indexes was improved in Tiled 1.11. Outputs without an index are now always applied, and when an output index is entirely empty for a given rule, it is never chosen. The latter allows setting up rule maps where only some rules have multiple outputs, a feature we’ll rely on in this article.
Now, add the following output layers to the rule map:
output2_Automapoutput3_Automapoutput4_Automapoutput5_Automap
We basically need as many output indices as we have variations. There are more than 5 variations for some tiles, but this will do for now. We’ll add some variation to the rule placing the floor tiles, by changing that rule as follows:
| Layer | Tiles |
|---|---|
output5_Automap |
 |
output4_Automap |
 |
output3_Automap |
 |
output2_Automap |
 |
output1_Automap |
 |
input_Blueprint |
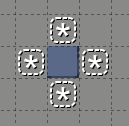 |
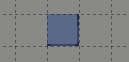
To keep the floor from becoming too noisy, we’ll tweak the probability of the first output. Select the “output1Automap” layer and open _Layer > Layer Properties. Change the “Probability” property from 1.0 (the default) to 3.0. Now, the plain floor tile will be chosen three times as likely as each of its variations (so on average it will be chosen 3 times out of every 7 matches).
Be sure to try it out! Notice that when using Automapping while drawing, only the edited area is randomized, whereas triggering the AutoMap action will randomize the entire floor.
Note
The “Probability” set on the “output1_Automap” layer will apply to that output index for all rules. If we need to avoid this for some rules, we could leave “output1_Automap” empty for those rules and use another index for that output instead. Also, since the probability is relative, it will not affect rules which have only one output.
I’ll leave it to you to add variations to the other rules in the same fashion. The dungeon tileset provides many variations for wall edges as well as wall end tiles.
Circles on the Floor
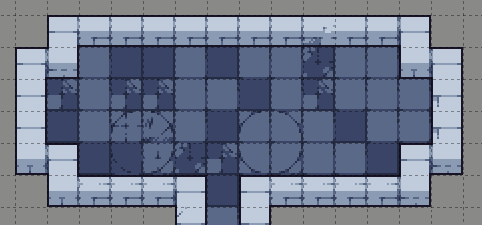
There are a few floor tiles in the tileset which are meant to be placed together to form a circle. Let’s set up a rule that places these circles in random fashion. We’ll add this rule after placing the other floor tiles.
Note
We could place the circles first as well, but we’d then have to change our floor rule to check which locations in the “Automap” layer are still empty. While this can be done by using the special “Empty” tile in an “input_Automap” layer, this creates a dependency between the rules. Because of that we’d need to enable the “MatchInOrder” property on the rule map, to disable concurrent matching. Placing the circles later is the simpler solution here.
Paint the following rule either below or to the right of the rule placing the single floor tiles (location of top-left corner matters):
| Layer | Tiles |
|---|---|
output3_Automap |
 |
output2_Automap |
 |
output1_Automap |
 |
input_Blueprint |
 |
Remember that we changed the “Probability” of “output1_Automap” to 3.0 when we randomized our floor, and this will also apply to this rule.
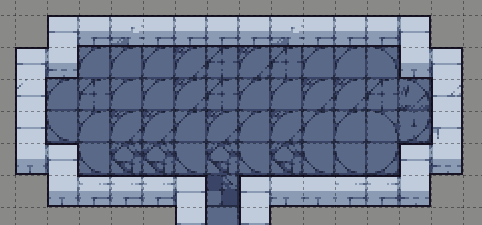
When you try out this rule, you’ll notice two issues:
- It places overlapping circles, which isn’t desirable.
- When a circle fits, it always places a circle. We’d like them to appear less frequently.
Fixing these issues requires specifying some per-rule options. Here’s how we will set this up:
- Switch to the rule map and create an Object layer called “rule_options”.
- Insert a Rectangle object covering (not just touching) the rule placing the circles. The properties set on the Rectangle object will apply to all covered rules.
- Open the Properties for the Rectangle object.
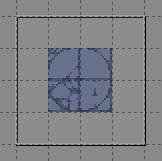
There are two options we can use to avoid placing overlapping circles, with different results:
-
Enable the “NoOverlappingOutput” option. While applying the rule, this option will cause the selected output to be skipped entirely when part of it would overlap with previous output applied by the same rule.
-
Set the “ModX” and “ModY” options to 2. These options specify the number of tiles between each location where the rule may be applied (starting from “OffsetX” and “OffsetY”). Since the circles are 2x2, this will avoid ever placing them partially on top of each other.
The difference is that the second approach will place all circles aligned to a 2x2 tile grid. This may or may not be desired.
Note
The custom properties applying to Automapping are shown in the Properties view, because Tiled understands your map is a rule map by virtue of having an “input” and an “output” layer.
To place the circles less frequently, set the “Probability” to 0.1. This means that the rule will only apply 1 in every 10 locations on average.
Finally I’ll mention the “Disabled” property. This can be used to temporarily disable a rule or an entire region of rules, which can be very useful while testing your rules.
Random Decorations
Along with the dungeon tileset we are also given tilesets with static and animated objects. While many will want to place such decorative objects manually in order to have full control over the contents of the dungeon, we obviously could try to do this randomly as well!
I’ll leave it up to you whether you want to play with that, but it would be a good idea to set up a separate rule map for this and add it in the rules.txt file (creating one if you hadn’t done this before).
For this new rule map, you’ll most definitely want to enable the “MatchInOrder” property. This allows your rules to match against the output of previously applied rules within the same rule map. For example, a rule that places tables in suitable locations will want to make sure there is still room for them. And a rule that places chairs may want to check for tables to place them next to.
Preventing Manual Edits to the Automap Layer
Since we’re populating the “Automap” layer entirely based on rules, we can lock this layer to prevent manual edits that would get overwritten the next time the rules are applied.
By default, Automapping will not apply any changes to locked layers. To change this, open the rule map, go to Map > Map Properties and enable the “IgnoreLock” property. Now we can leave the “Automap” layer locked in our dungeon map.
Automapping Without Fear
In this tutorial we’ve learned a lot about Automapping in Tiled, in particular how to use it with a “Blueprint” layer. However, there are many other ways to use Automapping and there are still many features to learn about! If you want to know everything, be sure to read the Automapping chapter in the Tiled manual.
Finally, don’t be afraid to ask for help on the Tiled Discord server or on the Tiled forum. You’ll surely find somebody who can help you out!